The Seven Strategies
Strategy 1: Decide what you’re looking at.
Strategy 2:Determine the purpose and audience.
Strategy 3: Look for bias.
Strategy 4: Examine closely the source itself.
Strategy 5: Find more information.
Strategy 6: Consider your own role in the interaction.
Strategy 7: Compare a variety of sources.
The Primary Source
Background
The Photo From 1904 through1936 a man named Albert Stone was a photographer with the Rochester Herald, the Democrat and Chronicle. He took thousands of amazing photographs of the people and events of his community. Those photographs are now part of the collections of the Monroe County Library System and can be accessed online through the Rochester Images database.
The Subject –Disabled Children in the 1920s In the late 19thcentury and early 20th compulsory school attendance laws began to be passed. Many people with disabilities were institutionalized or attended special schools. Henry Edward Abt, writing in 1924, outlined the philosophy behind this kind of separation: “A modern, properly conducted orthopedic school, convalescent home, hospital, or sanatorium will never result in‘institutionalizing’ its patients. On the contrary, the child is furnished with companions of his own age, similarly handicapped, able to develop with him games and sports in which a crippled child can participate. Thus during those formative years of his life, rarely reminded of his disability, the child develops a healthy, normal psychology.” The idea of mainstreaming students with disabilities did not become common until the 1960s and 1970s.
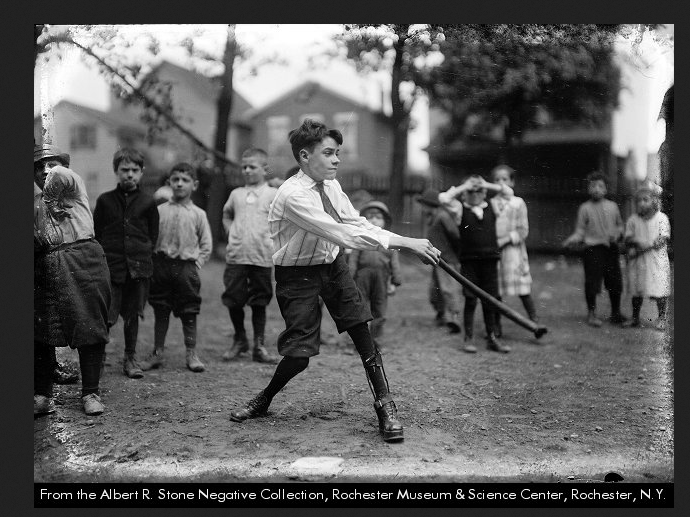
It appears from these photographs, that Rochester had a school (Central School No. 5) devoted to disabled students. In 1916, an epidemic of polio affected 27,000 people in the U. S., 80 percent of them under the age of five. The boy in the photograph used in this lesson, Clarence Lehr, may very well have been one of the older victims.
The Lesson Step-by-Step
As a class examine the photograph using the seven strategies.
Strategy 1: Decide what you’re looking at. Introduce students to the photograph and help them determine that it is a photograph. Next, if appropriate for your students’ age group and development level, work with them to find out whether they think it is a primary source. (This is a primary source because it was created by a witness to the event itself.) Or you might want to go on to other strategies, and then return to Strategy 1 and the question of whether this is a primary source after more exploration of the object itself.
Strategy 4: Examine closely the source itself. Ask the following questions and note students’ answers on the board:
- What or who is this photograph mostly about? (The boy in front.)
- Can you tell me what he looks like? How would you tell someone what he looks like? Or Can you describe him? (He has short dark hair. He’s wearing a shirt and tie and short pants. He is kind of handsome. He looks serious, etc.)
- What is he doing? [If you have students who are kinesthetic learners, have them stand and take the same pose as the figure](He’s swinging a stick, maybe a bat.)
Use the grid system. After you have an initial reaction and have focused on the central figure, place a grid over the photo that breaks it into four or six squares. If you’re using a whiteboard, use the markup tool to draw the grid. If you’re using a printed copy of the photo, you can use an acetate overlay or make two copies of the photo, one without and one with grid.
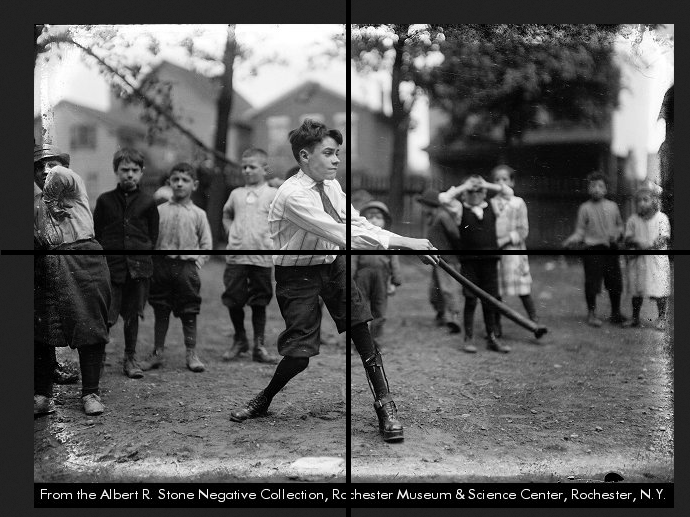
Work with students to examine each cell and note details within in it. Depending upon the age and development of your students you can lead or prompt. Ask:
- What do you see in the top left square? (houses, trees, boys. Boy batting is wearing a tie. One boy is pointing at the camera.)
- What do you see in the top right square? (another house, another tree, boys and girls. The girls have bows in their hair.)
- What do you see in the bottom right square? (The girls have skirts on. The boy batting has something on his leg. The bat looks different from the kind we have now. There are chalk lines on the ground and a square base.)
- What do you see in the bottom left square? (The boys are wearing short pants that bunch in at the knees.)
After the class has closely examined the photograph, return to more general questions. Ask:
- Is this now or is this in the past? How do you know? (In the past. The way people are dressed.)
- Where do you think this picture was taken? On a farm? In a town or city? Why? (In a town. There are houses right next to each other.)
Then help students synthesize and summarize this information.
This is a photograph of a boy who is swinging a bat. He is wearing short pants and a shirt and tie. He has a brace (a “funny thing”) on one leg. [Here it might be necessary to explain to students what a brace is and why someone might need to wear one.] One shoe has a tall sole. Other children are watching the boy play and are looking at the photographer who is taking the picture. The boys in the picture are all wearing short pants. The girls are all wearing dresses and have bows in their hair. The picture also shows houses and trees. All the children are standing. There are no seats or bleachers showing in the photo. There is a chalk line and home plate. This photo shows a town or city. This photo was taken in the past. We know this because the people in the picture dress like they did a long time ago.
Now that you have looked closely at the image and learned about it,you can employ Strategy 2.
Strategy 2: Determine the purpose and audience. Explain to students that there is always a reason for taking a photograph. And the photographer usually knows who is going to look at the photo. To help them determine the purpose and audience of this primary source, provide students with the caption for this photograph.
Clarence Lehr swings a baseball bat as other children watch from behind. Lehr hit two home runs in this game. This picture was taken by Albert Stone and was printed in a newspaper, the Rochester Herald, on May 15, 1921.
Young learners might not be familiar with the concept of local newspapers and local photographers taking pictures of local events. Explain that, in the past, newspapers had stories about events of interest to the people who read them. They would also have stories about different people in the community. These were called “human interest” stories. If possible bring in a local newspaper and share it with your students. Talk about how your students learn about local events in their community.
Note: Applying Strategy 4 before you read the caption of the photograph is challenging and interesting and really helps students develop close examination skills. With very young students, however, it is usually best to provide the caption and, possibly, some background information.
Strategy3: Look for bias. Introduce students to the concept of bias. Explain that people decide what they’re going to put into a photograph and how they want it to look. That reflects their bias,what they want to communicate. Ask:
- Why might the photographer have wanted to take a picture of Clarence Lehr playing baseball? (To show that it is a good school, to show the life of the community). Did the photographer like his subject or want to show him in a nice way? (Yes.)
- How do you think this might have affected the kind of picture the photographer took? (The photographer probably took pictures when the kids were doing good things and looking like they were having a good time. He probably didn’t take pictures of the kids looking angry or unhappy.)
Strategy 6: Consider your own role in the interaction. You can introduce even quite young learners to the exercise of examining what they are bringing to an examination of an image. Ask:
- Are you surprised that a boy with braces is playing baseball? Why or why not?
- What about a boy wearing a tie?
- Do you think the children watching are also playing the game or only watching? Why or why not?
- What about the girls in the picture? Do you think they were playing? Why or why not?
Talk with studentsabout what they bring to the viewing of the picture, what assumptionsthey make and why. (By the way, there were girls playing in the game,wearing dresses and bows. This is clear from other photographs taken at the same event.)
Extend for More Advanced Learners
For older or more advanced learners you can extend the lesson and employ more of the strategies. After you have introduced the concept of bias and asked the questions in the basic lesson, continue the discussion of bias by introducing other kinds of photographs and the kinds of bias you might detect in them. If you have studied child labor and seen the photographs by Lewis Hine of newsboys and mill workers, remind students about these photographs. Ask:
- What was Lewis Hine’s bias when he took his child labor photographs? (Child labor is wrong.)
- What do you think Albert Stone’s bias was in taking this photograph of a disabled boy playing baseball? (Disabled kids can do good things.)
Remind students that bias is not necessarily a bad thing, but it is something they need to keep in mind while examining a photograph or a text.